


Setting up Laravel with Inertia.js should be straightforward, but it's not the same if you want to install it with Svelte.
While implementing it myself, I faced some issues which I'm sure you're gonna face as well. And that's the reason I decided to write this blog.
So, let's get started.
Setting up Laravel.
Let's start by installing a fresh version of Laravel. I'm gonna name my project as inertia-svelte
composer create-project laravel/laravel inertia-svelte
Server-side setup
Install dependencies
Once Laravel is installed, the first step when setting up Inertia is configuring our server-side framework. So, let's start by installing the inertia-laravel package.
composer require inertiajs/inertia-laravel
Setting up the Root template
Next, we need to set up a root template that will be loaded on the first-page visit to our application. This will be generally used to load our site assets (CSS and JavaScript), and will also contain a root div in which, inertia will boot our JavaScript application.
<!DOCTYPE html>
<html>
  <head>
    <meta charset="utf-8" />
    <meta name="viewport" content="width=device-width, initial-scale=1.0, maximum-scale=1.0" />
    @vite('resources/js/app.js')
    @inertiaHead
  </head>
  <body>
    @inertia
  </body>
</html>
This template should include our assets, as well as the @inertia and @inertiaHead directives.
By default, Inertia's Laravel adapter will assume that our root template is named app.blade.php. If you want to use a different root view, you can change it using the Inertia::setRootView() method.
Middleware
Next, we need to set up the Inertia middleware. We can accomplish this by publishing the HandleInertiaRequests, which can be done using the following Artisan command.
php artisan inertia:middleware
The middleware this command publishes looks like this, we can use this middleware to pass in authenticated users and other details to the front end.
<?php

namespace App\Http\Middleware;

use Illuminate\Http\Request;
use Inertia\Middleware;

class HandleInertiaRequests extends Middleware
{
    /**
     * The root template that's loaded on the first page visit.
     *
     * @see https://inertiajs.com/server-side-setup#root-template
     * @var string
     */
    protected $rootView = 'app';

    /**
     * Determines the current asset version.
     *
     * @see https://inertiajs.com/asset-versioning
     * @param  \Illuminate\Http\Request  $request
     * @return string|null
     */
    public function version(Request $request): ?string
    {
        return parent::version($request);
    }

    /**
     * Defines the props that are shared by default.
     *
     * @see https://inertiajs.com/shared-data
     * @param  \Illuminate\Http\Request  $request
     * @return array
     */
    public function share(Request $request): array
    {
        return array_merge(parent::share($request), [
            //
        ]);
    }
}
Once the middleware has been published, let's register the HandleInertiaRequests middleware in our App\Http\Kernel as the last item in our web middleware group.
'web' => [
    // ...
    \App\Http\Middleware\HandleInertiaRequests::class,
],
Client-side setup
Once we have our server-side framework configured, it's time to set up our client-side framework.
And since we will be using Svelte as a frontend, we'll be installing dependencies related to Svelte.
Let's start by installing the inertiajs/svelte package.
npm install @inertiajs/svelte
Initialize the Inertia app
Next, we need to update our main JavaScript file to boot our Inertia app. To accomplish this, we'll make changes to our app.js file located inside resources/js/ folder.
import './bootstrap';
import { createInertiaApp } from '@inertiajs/svelte'

createInertiaApp({
  resolve: name => {
    const pages = import.meta.glob('./Pages/**/*.svelte', { eager: true })
    return pages[`./Pages/${name}.svelte`]
  },
  setup({ el, App, props }) {
    new App({ target: el, props })
  },
})
Additional Setup
The official documentation only covers these basics for setting up Inertia with Svelte.
So, this section includes the additional steps needed to fully configure this stack.
Let's start by modifying the package.json and adding a new key-value pair as shown below.
    "private": true,
    "type": "module",
You can add that after the "private": true key-value pair.
After this step, we need to install a package called sveltejs/vite-plugin-svelte.
npm install @sveltejs/vite-plugin-svelte
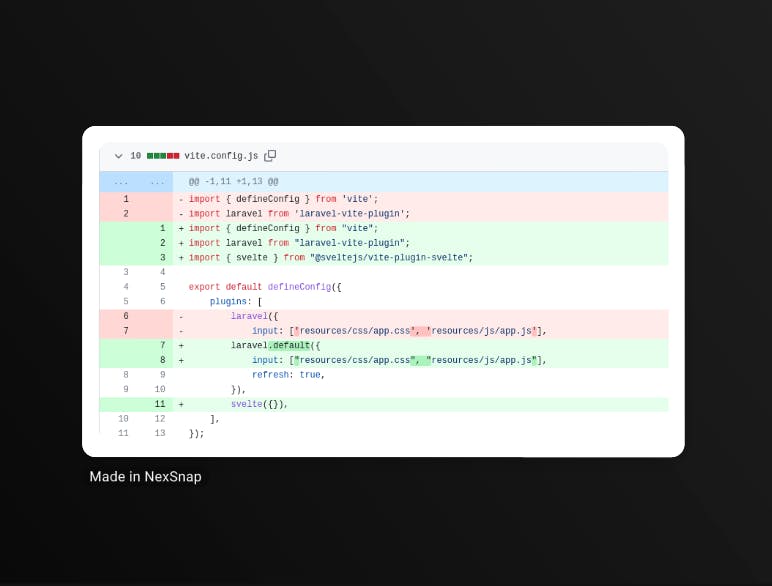
We also need to make a few changes to vite.config.js file.
The final output looks like this:
import { defineConfig } from "vite";
import laravel from "laravel-vite-plugin";
import { svelte } from "@sveltejs/vite-plugin-svelte";

export default defineConfig({
    plugins: [
        laravel.default({
            input: ["resources/css/app.css", "resources/js/app.js"],
            refresh: true,
        }),
        svelte({}),
    ],
});
The changes that we made are shown below:
And now we're almost done, the only thing remaining is to spin up our PHP and node servers, to do that, we'll run php artisan serve and npm run dev and this should now render our svelte files using Inertia.
The repository for this demo is linked here
Laravel/Inertia/Svelte Course
I guess you've already figured out that I'm loving this stack and I have been exploring it a lot lately, and to further improve your skills and help you get started, I have created a Udemy Course based on this stack, where we'll build multiple practical projects and learn a ton of stuff along the way.
You can check out the Course here
Video Resource
If you prefer a video instead of a blog, you can check out this video which I launched a while ago.
While you are here, make sure to check out other videos and subscribe to the channel.
I do have plans and will be launching more videos on the SILT Stack.